Installation
Install PurgeTSS globally on your machine using NPM.
> [sudo] npm install -g purgetss
PurgeTSS has been thoroughly tested and proven to be compatible with Node version 20.x.x.
Running PurgeTSS for the First Time
You only need to execute purgetss once within your project to automatically generate the required files and folders.
Subsequently, whenever you build your application, PurgeTSS will parse all your XML files and generate a clean app.tss file containing only the classes used in your project.
When you run purgetss for the first time in your project, it will perform the following tasks:
1. Auto-Run Hook
PurgeTSS adds a task in alloy.jmk to auto-run purgetss every time you compile your app. This is especially useful when using liveview.
2. purgetss Folder
Upon execution, PurgeTSS creates a purgetss folder at the root of your project containing the following files and folders:
purgetss
└─ fonts
└─ styles
   └─ definitions.css
   └─ tailwind.tss
└─ config.js
-
config.jsFileThis is where you can customize or create new classes with your preferred spacing, colors, margin values, and more. For further details, refer to the Customization Section.
-
stylesFolderThe
stylesfolder contains thetailwind.tssanddefinitions.cssfiles:-
tailwind.tssFileThis file includes all Tailwind-like utility classes, including any custom classes defined in
config.js. -
definitions.cssFileA special
cssfile that incorporates ALL classes fromtailwind.tss,_app.tss, any.tssremaining in your project, andfonts.tssfiles. This encompasses all classes from official icon font libraries, meant for use with the “IntelliSense for CSS class names in HTML” VS Code extension.
-
-
fontsFolderHere, you can add various font types such as Icons, Serif, Sans-Serif, Cursive, Fantasy, or Monospace fonts, all applicable to your app. Step-by-step instructions are available in the build-fonts command section.
PurgeTSS will OVERWRITE your existing app.tss file.
Upon the initial execution of PurgeTSS, your app.tss file is backed up to _app.tss.
From this point forward, you have the option to add, delete, or update your custom classes in _app.tss.
Alternatively, a better approach is to include your custom values in config.js. Further information is available in the Configuration Section.
Example Files
To use the example files:
- Copy the content of
index.xmlandapp.tssinto a new Alloy project. - Install Font Awesome font files with
purgetss icon-library --vendor=fontawesome. - Run
purgetssonce to generate the necessary files. - Compile your app as usual.
- We recommend using
liveviewto speed up testing and development time.
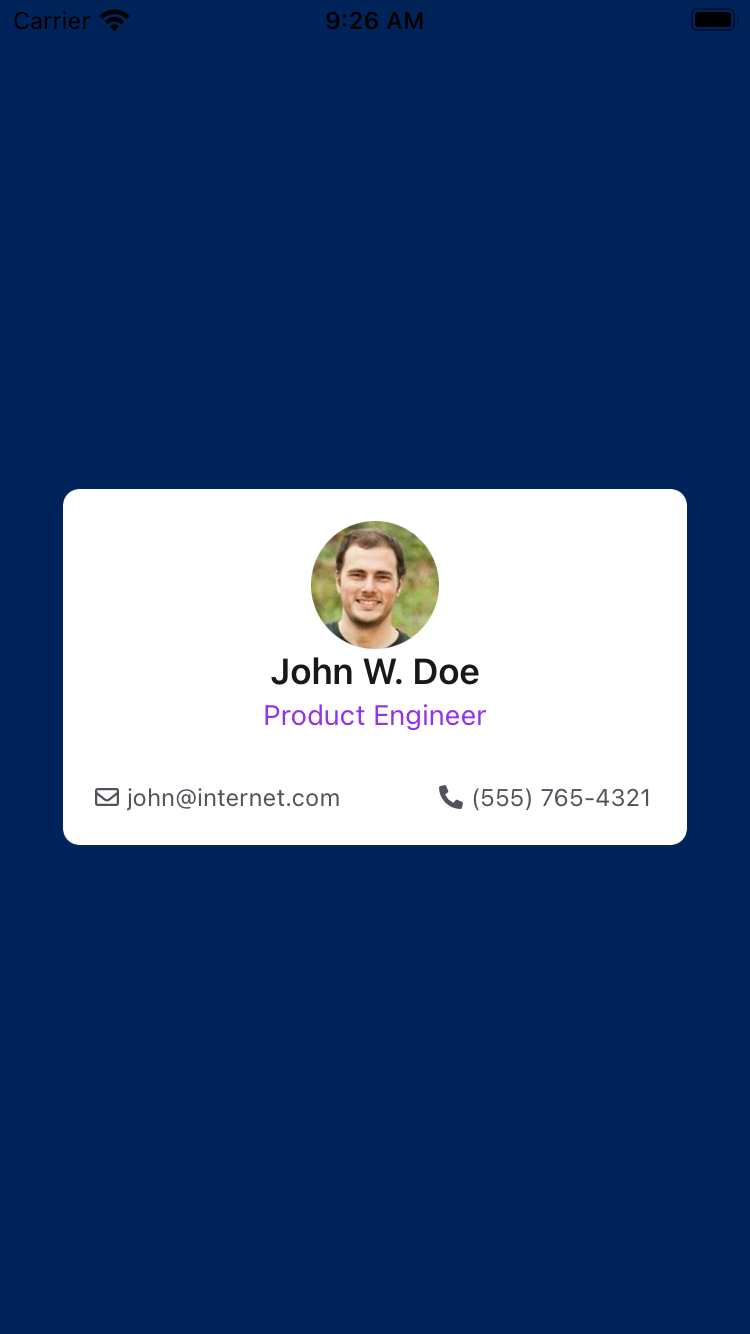
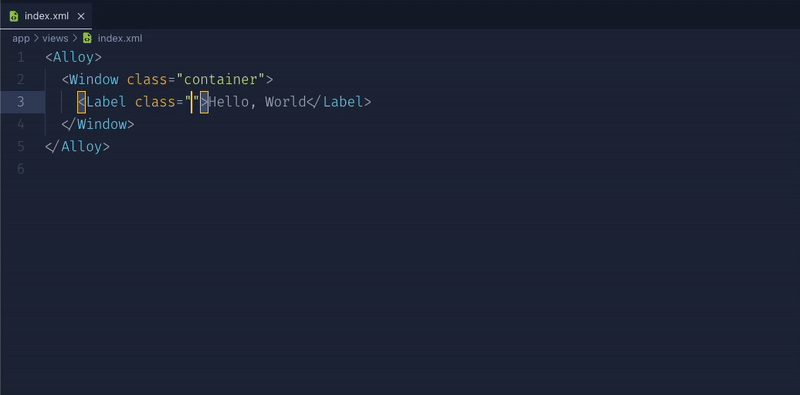
<Alloy>
  <Window class="bg-primary">
    <View class="w-10/12 h-auto bg-white rounded-lg">
      <View class="m-4 vertical">
        <ImageView class="w-16 h-16 mx-auto rounded-16" image="https://randomuser.me/api/portraits/men/43.jpg" />

        <View class="vertical">
          <Label class="text-lg font-semibold text-center text-gray-900">John W. Doe</Label>
          <Label class="text-sm text-center text-purple-600 mt-0.5">Product Engineer</Label>

          <View class="w-screen mt-6">
            <View class="ml-0 horizontal">
              <Label class="mr-1 text-xs text-gray-600 far fa-envelope"></Label>
              <Label class="text-xs text-gray-600">john@internet.com</Label>
            </View>

            <View class="mr-0 horizontal">
              <Label class="mr-1 text-xs text-gray-600 fas fa-phone-alt"></Label>
              <Label class="text-xs text-gray-600">(555) 765-4321</Label>
            </View>
          </View>
        </View>
      </View>
    </View>
  </Window>
</Alloy>
'.bg-primary': {
  backgroundColor: '#002359'
}
After running purgetss, you will have a new app.tss file with only the classes used in the XML files.
Your original app.tss file is backed up in _app.tss. You can use this file to add, delete, or update any of your original styles.
Every time purgetss runs, it will copy the content of _app.tss to app.tss.
/* PurgeTSS v6.2.27 */
/* Created by César Estrada */
/* https://github.com/macCesar/purgeTSS */

/* _app.tss styles */
'.bg-primary': {
  backgroundColor: '#002359'
}

/* Ti Elements */
'ImageView[platform=ios]': { hires: true }
'View': { width: Ti.UI.SIZE, height: Ti.UI.SIZE }
'Window': { backgroundColor: '#FFFFFF' }

/* Main Styles */
'.bg-white': { backgroundColor: '#ffffff' }
'.font-semibold': { font: { fontWeight: 'semibold' } }
'.h-16': { height: 64 }
'.h-auto': { height: Ti.UI.SIZE }
'.horizontal': { layout: 'horizontal' }
'.m-4': { top: 16, right: 16, bottom: 16, left: 16 }
'.ml-0': { left: 0 }
'.mr-0': { right: 0 }
'.mr-1': { right: 4 }
'.mt-0.5': { top: 2 }
'.mt-6': { top: 24 }
'.mx-auto': { right: null, left: null }
'.rounded-16': { borderRadius: 32 }
'.rounded-lg': { borderRadius: 8 }
'.text-center': { textAlign: Ti.UI.TEXT_ALIGNMENT_CENTER }
'.text-gray-600': { color: '#4b5563', textColor: '#4b5563' }
'.text-gray-900': { color: '#111827', textColor: '#111827' }
'.text-lg': { font: { fontSize: 18 } }
'.text-purple-600': { color: '#9333ea', textColor: '#9333ea' }
'.text-sm': { font: { fontSize: 14 } }
'.text-xs': { font: { fontSize: 12 } }
'.vertical': { layout: 'vertical' }
'.w-10/12': { width: '83.333334%' }
'.w-16': { width: 64 }
'.w-screen': { width: Ti.UI.FILL }

/* Default Font Awesome */
'.fa-envelope': { text: '\uf0e0', title: '\uf0e0' }
'.fa-phone-alt': { text: '\uf879', title: '\uf879' }
'.far': { font: { fontFamily: 'FontAwesome6Free-Regular' } }
'.fas': { font: { fontFamily: 'FontAwesome6Free-Solid' } }
Find more examples in the Tailwind TSS Sample App
VSCode Extension
If you're using Visual Studio Code, we recommend installing the IntelliSense for CSS class names in HTML extension.
It provides class name completion for the XML class attribute based on the definitions.css file created by PurgeTSS.
After installing the extension, you'll need to add the xml language to the "HTMLLanguages" setting and exclude any css/html files from the caching process by pointing "excludeGlobPattern" to the ./purgetss/fonts/ folder.
{
  "html-css-class-completion.HTMLLanguages": [
    "html",
    "vue",
    "razor",
    "blade",
    "handlebars",
    "twig",
    "django-html",
    "php",
    "markdown",
    "erb",
    "ejs",
    "svelte",
    "xml"
  ],
  "html-css-class-completion.excludeGlobPattern": "**/node_modules/**,purgetss/fonts/**/*.{css,html}"
}