Installation
Install PurgeTSS globally on your machine with NPM.
> [sudo] npm install -g purgetss
PurgeTSS requires Node 20.0.0 or higher.
Run PurgeTSS the first time
Run purgetss once in your project to generate the required files and folders.
After that, every build parses your XML files and writes a clean app.tss with only the classes your project actually uses.
When you run purgetss for the first time in a project, it does the following:
1. Auto-run hook
PurgeTSS adds a task in alloy.jmk so it runs every time you compile the app. It plays well with liveview.
2. purgetss folder
PurgeTSS creates a purgetss folder at the root of the project:
purgetss
└─ fonts
└─ styles
   └─ definitions.css
   └─ utilities.tss
└─ config.cjs
-
config.cjsfileThis is where you customize defaults or add your own classes. For details, see the customization section.
-
stylesfolderThe
stylesfolder contains theutilities.tssanddefinitions.cssfiles:-
utilities.tssfileThis file includes all utility classes, including any custom classes defined in
config.cjs. -
definitions.cssfileA CSS file that combines classes from
utilities.tss,_app.tss, any.tssfiles in your project, andfonts.tss. The "IntelliSense for CSS class names in HTML" VS Code extension uses it for autocomplete.
-
-
fontsfolderPlace icon, serif, sans-serif, or monospace font files here. See the Custom fonts page for instructions.
PurgeTSS overwrites your existing app.tss file.
On the first run, your original app.tss is backed up to _app.tss.
From that point on, you add, delete, or update custom classes in _app.tss.
You can also move custom values into config.cjs. For details, see the configuration section.
Example files
To use the example files:
- Copy the content of
index.xmlandapp.tssinto a new Alloy project. - Install Font Awesome font files with
purgetss icon-library --vendor=fontawesome. - Run
purgetssonce to generate the necessary files. - Compile your app as usual.
- Use
liveviewfor faster iteration.
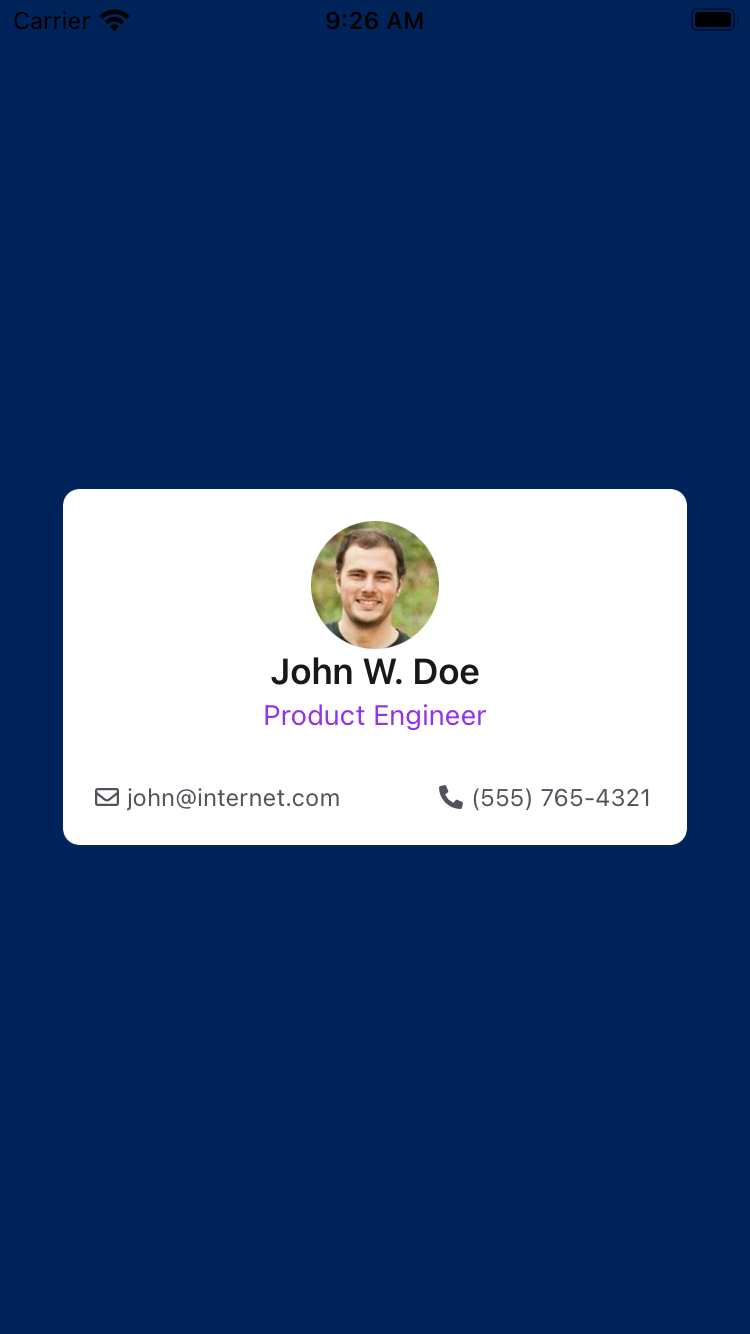
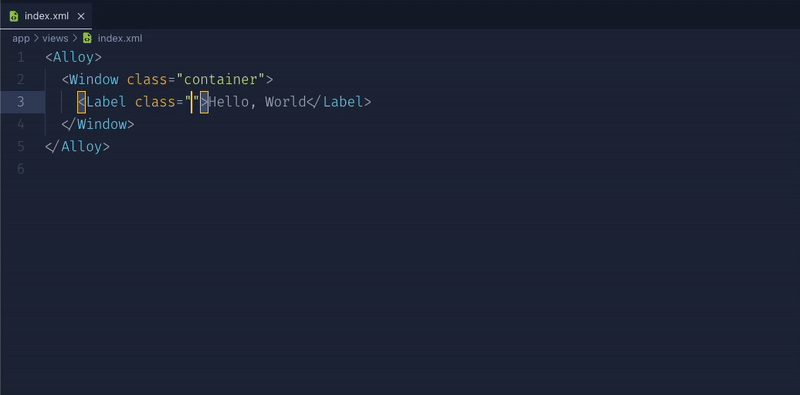
<Alloy>
  <Window class="bg-primary">
    <View class="h-auto w-10/12 rounded-lg bg-white">
      <View class="vertical m-4">
        <ImageView class="rounded-16 mx-auto h-16 w-16" image="https://randomuser.me/api/portraits/men/43.jpg" />

        <View class="vertical">
          <Label class="text-center text-lg font-semibold text-gray-900">John W. Doe</Label>
          <Label class="mt-0.5 text-center text-sm text-purple-600">Product Engineer</Label>

          <View class="mt-6 w-screen">
            <View class="horizontal ml-0">
              <Label class="far fa-envelope mr-1 text-xs text-gray-600"></Label>
              <Label class="text-xs text-gray-600">john@internet.com</Label>
            </View>

            <View class="horizontal mr-0">
              <Label class="fas fa-phone-alt mr-1 text-xs text-gray-600"></Label>
              <Label class="text-xs text-gray-600">(555) 765-4321</Label>
            </View>
          </View>
        </View>
      </View>
    </View>
  </Window>
</Alloy>
'.bg-primary': {
  backgroundColor: '#002359'
}
After running purgetss, app.tss contains only the classes used in your XML files.
Your original app.tss is backed up as _app.tss. Use that file to add, delete, or update your custom styles.
Every time purgetss runs, it copies the content of _app.tss into app.tss.
// PurgeTSS v7.10.2
// Created by César Estrada
// https://purgetss.com

/* _app.tss styles */
'.bg-primary': {
  backgroundColor: '#002359'
}

/* Ti Elements */
'ImageView[platform=ios]': { hires: true }
'View': { width: Ti.UI.SIZE, height: Ti.UI.SIZE }
'Window': { backgroundColor: '#FFFFFF' }

/* Main Styles */
'.bg-white': { backgroundColor: '#ffffff' }
'.font-semibold': { font: { fontWeight: 'semibold' } }
'.h-16': { height: 64 }
'.h-auto': { height: Ti.UI.SIZE }
'.horizontal': { layout: 'horizontal' }
'.m-4': { top: 16, right: 16, bottom: 16, left: 16 }
'.ml-0': { left: 0 }
'.mr-0': { right: 0 }
'.mr-1': { right: 4 }
'.mt-0.5': { top: 2 }
'.mt-6': { top: 24 }
'.mx-auto': { right: null, left: null }
'.rounded-16': { borderRadius: 32 }
'.rounded-lg': { borderRadius: 8 }
'.text-center': { textAlign: Ti.UI.TEXT_ALIGNMENT_CENTER }
'.text-gray-600': { color: '#4b5563', textColor: '#4b5563' }
'.text-gray-900': { color: '#111827', textColor: '#111827' }
'.text-lg': { font: { fontSize: 18 } }
'.text-purple-600': { color: '#9333ea', textColor: '#9333ea' }
'.text-sm': { font: { fontSize: 14 } }
'.text-xs': { font: { fontSize: 12 } }
'.vertical': { layout: 'vertical' }
'.w-10/12': { width: '83.333334%' }
'.w-16': { width: 64 }
'.w-screen': { width: Ti.UI.FILL }

/* Default Font Awesome */
'.fa-envelope': { text: '\uf0e0', title: '\uf0e0' }
'.fa-phone-alt': { text: '\uf879', title: '\uf879' }
'.far': { font: { fontFamily: 'FontAwesome7Free-Regular' } }
'.fas': { font: { fontFamily: 'FontAwesome7Free-Solid' } }
More examples in the Utilities TSS Sample App.
Label, Button, and Switch with opposite marginsIn Titanium, Label, Button, and Switch can stretch when opposite margins pin both sides of the same axis and the dimension is still implicit.
mt-*+mb-*ormy-*can stretch the component vertically. Addh-auto.ml-*+mr-*ormx-*can stretch the component horizontally. Addw-auto.- If margins affect both axes, use
wh-auto.
This applies to any component whose default size is Ti.UI.SIZE. If you set opposite margins on the same axis, such as left and right, Titanium's composite layout uses those pins to calculate the dimension instead of the content. The component then stretches to fill its parent.
Examples:
<Label class="mt-2 mb-4 h-auto" text="Only content height" />
<Label class="mx-4 w-auto" text="Only content width" />
<Label class="m-4 wh-auto" text="Safe reset on both axes" />
<Switch class="my-1 mr-2 h-auto" onChange="onChanged" />
XML validation
Before purging, PurgeTSS pre-checks every XML file in your project. One case worth calling out: double dashes (--) are not allowed inside XML comments. That comes from the XML spec itself, not from PurgeTSS, but many people only run into it once a tool actually parses the file.
<!-- Options: --flag or --value -->
The --flag inside that comment is illegal. PurgeTSS stops with a pointer to the line:
XML comment contains illegal "--" sequence ("--flag")
Fix: Replace "--" with an em dash or reword the comment to avoid double dashes
Either swap -- for an em dash or rephrase so the two dashes don't sit next to each other. Any XML parser would reject the original, so catching it up front is more helpful than a confusing TSS output later.
VSCode extension
If you're using Visual Studio Code, install the IntelliSense for CSS class names in HTML extension.
It provides class name completion for the XML class attribute based on the definitions.css file created by PurgeTSS.
After installing the extension, add the xml language to the "HTMLLanguages" setting and exclude any css/html files from the caching process by pointing "excludeGlobPattern" to the ./purgetss/fonts/ folder.
{
  "html-css-class-completion.HTMLLanguages": [
    "html",
    "vue",
    "razor",
    "blade",
    "handlebars",
    "twig",
    "django-html",
    "php",
    "markdown",
    "erb",
    "ejs",
    "svelte",
    "xml"
  ],
  "html-css-class-completion.excludeGlobPattern": "**/node_modules/**,purgetss/fonts/**/*.{css,html}"
}